26 août 2025
Integrating an MCP into a React Application

8 minutes reading

The widespread adoption of AI and LLMs has made accessing virtually any information incredibly easy and fast, with no need for advanced technical knowledge. However, there are still scenarios where models simply lack the necessary context to provide precise answers. For example, answering a question about Stripe billing for a particular account is impossible without building a specific assistant—often by integrating tools. To address this, Anthropic, creators of Claude, introduced a communication protocol that allows you to supply contextual information to models—without the need for custom development tied to each context.
Model Context Protocol (MCP)
Model Context Protocol (MCP) is a communication standard designed to provide additional context to an LLM. As a developer, you’re probably already familiar with MCP if you use an IDE that supports AI agents (Cursor, Zed, etc.). An MCP server can provide different types of information:
In practice, the most common use case is to expose tools from your MCP server.
This server can then be made available either as a URL or as an executable.
Implementation
Let’s build a simple Next.js application that uses a MCP Postgres server. The objective is to answer requests in natural language and display information retrieved from a database.
bun create next-app
Now let’s install the necessary dependencies:
bun add ai @ai-sdk/anthropic @modelcontextprotocol/sdk pg react-markdown
Implementing the MCP Server
For the MCP server, we’ll reuse the Zed Postgres server, with slight modifications.
import { McpServer } from "@modelcontextprotocol/sdk/server/mcp.js";
import { StdioServerTransport } from "@modelcontextprotocol/sdk/server/stdio.js";
import {
  CallToolRequestSchema,
  ListToolsRequestSchema,
} from "@modelcontextprotocol/sdk/types.js";
import pg from "pg";

const { server } = new McpServer(
  {
    name: "postgres",
    version: "1.0.0",
  },
  {
    capabilities: {
      tools: {},
    },
  },
);

const stdioTransport = new StdioServerTransport();
Here we initialize an MCP server that exposes only data related to tools. Other capability types are available as well: resources, prompts, completions.
We’ll be using our MCP server as an executable. Communication will be performed using stdin and stdout, hence the use of StdioServerTransport. If you wanted to use HTTP transport instead, you’d use StreamableHTTPClientTransport and expose the MCP server on a port using something like express, for example.
const dbUrl = Bun.env.PG_URL;
const resourceBaseUrl = new URL(dbUrl!);
resourceBaseUrl.protocol = "postgres:";
resourceBaseUrl.password = "";

const pool = new pg.Pool({
  connectionString: Bun.env.PG_URL,
});
Now we set up our Postgres instance to establish a later connection.
Next, let’s define our tools. The first step is to expose a list of them:
server.setRequestHandler(ListToolsRequestSchema, async () => {
  return {
    tools: [
      {
        name: "pg-schema",
        description: "Returns the schema for a Postgres database.",
        inputSchema: {
          type: "object",
          properties: {
            mode: {
              type: "string",
              enum: ["all", "specific"],
              description: "Mode of schema retrieval",
            },
            tableName: {
              type: "string",
              description:
                "Name of the specific table (required if mode is 'specific')",
            },
          },
          required: ["mode"],
          if: {
            properties: { mode: { const: "specific" } },
          },
          then: {
            required: ["tableName"],
          },
        },
      },
      {
        name: "query",
        description: "Run a read-only SQL query",
        inputSchema: {
          type: "object",
          properties: {
            sql: { type: "string" },
          },
        },
      },
    ],
  };
});
ListToolsRequestSchema is a Zod schema. If the MCP server receives a request matching this schema, it will execute the function provided as the second argument. This function must return a list of tools, each including a name (which acts as a unique identifier), a description for the model, and a JSON Schema describing the input expected by the tool execution.
Now for tool execution:
server.setRequestHandler(CallToolRequestSchema, async (request) => {
  if (request.params.name === "pg-schema") {
    const mode = request.params.arguments?.mode;

    const tableName = (() => {
      switch (mode) {
        case "specific": {
          const tableName = request.params.arguments?.tableName;

          if (typeof tableName !== "string" || tableName.length === 0) {
            throw new Error(`Invalid tableName: ${tableName}`);
          }

          return tableName;
        }
        case "all": {
          return ALL_TABLES;
        }
        default:
          throw new Error(`Invalid mode: ${mode}`);
      }
    })();

    const client = await pool.connect();

    try {
      const sql = await getSchema(client, tableName);

      return {
        content: [{ type: "text", text: sql }],
      };
    } finally {
      client.release();
    }
  }

  if (request.params.name === "query") {
    const sql = request.params.arguments?.sql as string;

    const client = await pool.connect();
    try {
      await client.query("BEGIN TRANSACTION READ ONLY");
      // Force a prepared statement: Prevents multiple statements in the same query.
      // Name is unique per session, but we use a single session per query.
      const result = await client.query({
        name: "sandboxed-statement",
        text: sql,
        values: [],
      });
      return {
        content: [
          { type: "text", text: JSON.stringify(result.rows, undefined, 2) },
        ],
      };
    } finally {
      client
        .query("ROLLBACK")
        .catch((error) =>
          console.warn("Could not roll back transaction:", error),
        );

      // Destroy session to clean up resources.
      client.release(true);
    }
  }

  throw new Error("Tool not found");
});

/**
 * @param tableNameOrAll {string}
 */
async function getSchema(client, tableNameOrAll) {
  const select =
    "SELECT column_name, data_type, is_nullable, column_default, table_name FROM information_schema.columns";

  let result;
  if (tableNameOrAll === ALL_TABLES) {
    result = await client.query(
      `${select} WHERE table_schema NOT IN ('pg_catalog', 'information_schema')`,
    );
  } else {
    result = await client.query(`${select} WHERE table_name = $1`, [
      tableNameOrAll,
    ]);
  }

  const allTableNames = Array.from(
    new Set(result.rows.map((row) => row.table_name).sort()),
  );

  let sql = "```sql\n";
  for (let i = 0, len = allTableNames.length; i < len; i++) {
    const tableName = allTableNames[i];
    if (i > 0) {
      sql += "\n";
    }

    sql += [
      `create table "${tableName}" (`,
      result.rows
        .filter((row) => row.table_name === tableName)
        .map((row) => {
          const notNull = row.is_nullable === "NO" ? "" : " not null";
          const defaultValue =
            row.column_default != null ? ` default ${row.column_default}` : "";
          return `    "${row.column_name}" ${row.data_type}${notNull}${defaultValue}`;
        })
        .join(",\n"),
      ");",
    ].join("\n");
    sql += "\n";
  }
  sql += "```";

  return sql;
}
Just as with listing tools, we use the CallToolRequestSchema to intercept execution requests for each tool.
Now we can start our server:
const main = async () => {
  await server.connect(stdioTransport);

  // For HTTP transport
  // app.post("/mcp", async (req, res) => {
  //   await transport.handleRequest(req, res);
  // });

  // app.listen(Number(Bun.env.PORT ?? 3001));
};

main();
Next.js Implementation (Client Side)
Let's create the page in our Next.js app using the Vercel AI SDK:
"use client";
import { useChat } from "ai/react";
import Markdown from "react-markdown";

export default function HomePage() {
  const { messages, input, handleInputChange, handleSubmit } = useChat();

  return (
    <div className="flex flex-col h-screen max-w-4xl mx-auto p-4">
      <div className="flex-1 overflow-y-auto mb-4">
        {messages.map((message, index) => (
          <div
            key={index}
            className={`mb-4 p-3 rounded-lg ${
              message.role === "user" ? "bg-blue-100 ml-8" : "bg-gray-100 mr-8"
            }`}
          >
            <div className="font-semibold text-sm text-gray-600 mb-1">
              {message.role === "user" ? "You" : "Assistant"}
            </div>
            <div className="text-gray-800">
              <Markdown>{message.content}</Markdown>
            </div>
          </div>
        ))}
      </div>

      <form onSubmit={handleSubmit} className="flex gap-2">
        <input
          value={input}
          onChange={handleInputChange}
          placeholder="Type your message..."
          className="flex-1 px-3 py-2 border border-gray-300 rounded-lg focus:outline-none focus:ring-2 focus:ring-blue-500"
        />
        <button
          type="submit"
          className="px-4 py-2 bg-blue-500 text-white rounded-lg hover:bg-blue-600 focus:outline-none focus:ring-2 focus:ring-blue-500"
        >
          Send
        </button>
      </form>
    </div>
  );
}
Next.js Implementation (Server Side)
Now, let's create our /api/chat API route, which is used by the useChat hook.
import { anthropic } from "@ai-sdk/anthropic";
import { experimental_createMCPClient, streamText } from "ai";
import { Experimental_StdioMCPTransport } from "ai/mcp-stdio";
import { NextRequest } from "next/server";

export async function POST(req: NextRequest) {
  const { messages } = await req.json();
  const mcpTransport = new Experimental_StdioMCPTransport({
    command: "bun",
    args: ["pg:mcp"],
  });

  const mcpClient = await experimental_createMCPClient({
    transport: mcpTransport,
    name: "postgres-mcp-client",
  });

  try {
    const tools = await mcpClient.tools();

    const result = streamText({
      model: anthropic("claude-4-sonnet-20250514"),
      messages,
      tools,
      maxSteps: 3,
      onError: async (error) => {
        await mcpClient.close();
      },
      onFinish: async () => {
        await mcpClient.close();
      },
    });

    return result.toDataStreamResponse();
  } catch (error) {
    console.error("Error:", error);
  }
}
The AI SDK currently provides experimental tools for interacting with MCP servers and retrieving their tools.
const mcpTransport = new Experimental_StdioMCPTransport({
  command: 'bun',
  args: ['pg:mcp'],
})

const mcpClient = await experimental_createMCPClient({
  transport: mcpTransport,
  name: 'postgres-mcp-client',
})
Here, we're creating a transport connected to the standard output used by our MCP server binary. This binary is run with the bun pg:mcp command, which we define in our package.json:
"pg:mcp": "dotenv -e .env -- bun ./mcp-server.ts"
Calling mcpClient.tools() returns a tools list that’s compatible with the AI SDK tools API, containing the correct name, description, parameters, and an execution function. Of course, you can connect to several MCP servers at once and combine their tools, but be aware of possible name collisions. The maxSteps: 3 option allows the stream to continue after using a tool—by default it's 1. Here, we set it to 3 so our tools for schema retrieval and SQL queries can run in sequence and return results to the client.
Let's test everything! Start the Next development server:
bun dev
Then open http://localhost:3000 to see your app live. You’ll see a simple page with an input field at the bottom. For my test, I tried the following:
Give me the first 5 user emails from my database
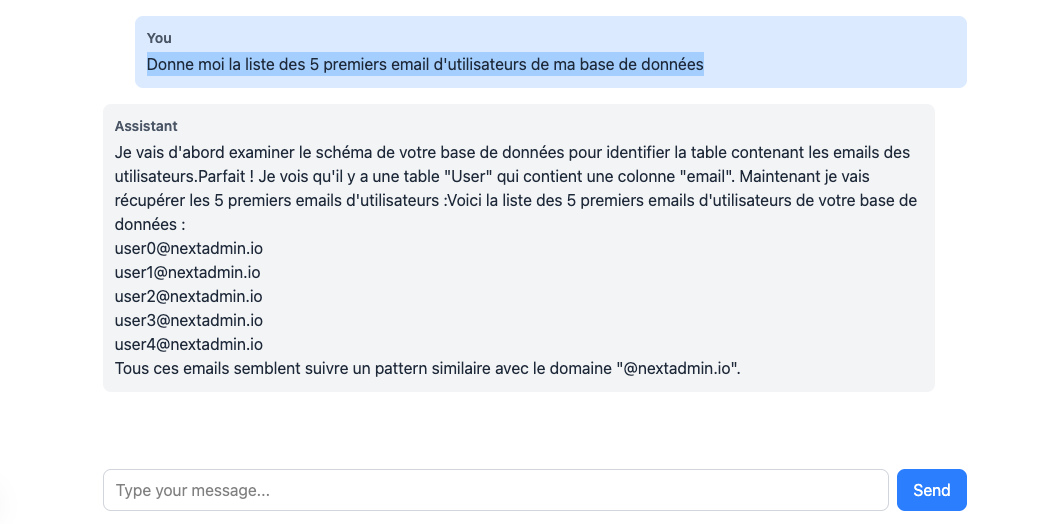
The LLM was able to return data it had no prior knowledge of, all thanks to tools retrieved from our MCP server.
Conclusion
MCP has, in many ways, revolutionized how we use LLMs. Their ability to bridge models and third-party APIs means even more powerful data access than before. You can easily imagine scenarios like in admin back offices, where aggregating data from multiple sources can be streamlined to a simple natural language query. MCP servers can also be installed on clients that support them—like IDEs, but also LLM applications such as Claude and ChatGPT. A comprehensive list of servers can be found on mcp.so—you're bound to find one that fits your needs.
Want to implement an MCP server for your application? Feel free to contact us!